0

Scon scones

scones

Scones scones. Scones scones. Scones scones. Scones scones. Scones scones. Scones scones. Scones scones. Scones scones. I’m saying it both ways. Clearly. One sounds like how it’s spelt. The other like there’s no ‘e’. Scons. I have no preference. I always seem to say both in quick succession. “ooh I really fancy scon scones I do”. “Shall I bake some scon scones?” Like that’s the proper way to say it. Maybe that should be the way to say it. Then the scon/scone confusion of the world with be confusion no more. I’m such a genius.

But back to the matter in hand. I made my first batch of scones. This hankering to make them myself started some time ago when I was given some shop bought ones at a friend’s house. I hadn’t had any for YEARS. Not since I was a kid and I loved them. A lot. But these were truly grimbles. All crumbly and tasteless. They made me sad. Then not long after, I had afternoon tea and ate fresh ones. My love affair with the scone was revved right up to max again! I didn’t care about the fancy desserts arranged all prettily on my three tired cake stand. The scones won hands down. All soft and buttery and light. Then even more recently I was watching The Berry on her cooking programme and she made the hallowed scones. So that was it. I just had to make them. I followed her recipe exactly and had huge success. She made small bite size ones, I prefer a larger scone so quite simply, I made a larger scone. Several in fact. The recipe makes loads so I froze a batch. I still have some I think… I will defrost some right now I think… and then eat them I think….

I like the classic fillings. Clotted cream (sounds rank, taste immense) and jam. Raspberry preferably. But strawberry is good too. Most red jams actually. Butter is nice if you don’t have cream, but slather it on THICK for the proper scone experience. Do you know what’s also great about a fully loaded scone? They contain on 5 calories each. Are full of all your essential vitamins and minerals. They make you more attractive and intelligent. And will ensure you live to at least 300! Who knew? Now go scoff.

0

Red Velvet cake

This is my last week at work. Sob. I’ve been here an eye watering SEVEN YEARS. Therefore, it is time for pastures new. As we all know, one of the best places to take a cake if you want applause and appreciation is work. When the day is long and you just want to go home, or you’re just greedy like me, cake is often what cheers up the day. So I felt I owed it to my colleagues to bake them something special. And here it is, ta-dar!!!

IMG_3702


A two-layer red velvet with cream cheese frosting and blueberries to decorate.

IMG_3707

Everything about this recipe I stole from here:

http://www.channel4.com/programmes/sunday-brunch/articles/all/red-velvet-cake-recipe

I added the blueberries myself though as I thought they’d look good and taste nice. And they did! I used tins smaller than the recipe said so had a fair bit of cake left over. I whizzed some of it in a small blender to get the crumbs. Makes a nice decoration don’t you agree?

IMG_3710Now I have to be honest. I did NOT like the cake at first. I tried some without the icing and thought it tasted barely of chocolate, not sweet enough and the texture was funky. But actually, when fully constructed with the super sweet icing and blueberries I was amazed, it tasted damn good! Super rich and slightly sickly in that lovely way birthday cakes often are, this is most definitely a treat cake. You know by just looking at it your arteries have shriveled a bit. But I think that sometimes cake is worth risking death for 🙂

Sarah

1

Black forest gateau

Black forest gateau inside

I’ll be the first to acknowledge that I’ve been a bit slack recently when it comes to blogging, but be assured that the baking certainly hasn’t suffered because I’ve been busy. Just the writing about it. So what better way to return to the blog than with a gateau…gateaux…gattoe…a black forest gateau to be precise. Is there any other kind?

Dictionary definitions of a gateau include a cake or pastry, especially a light one filled with custard, fruit, or nuts…an elaborate cake, usually layered with cream and richly decorated…a very rich, fancy cake, especially one with cream in it. I like to describe a gateau as a cake I want to put my face in.

With this recipe you’ll want to do just that. It has multiple layers of sponge, but not just any old sponge. This is the lightest sponge I have ever made. So light that it was actually quite difficult to cut in half because it was so delicate. Each layer of sponge is filled with double cream and cherries, then topped with chocolate and more cherries. It’s more time consuming than technical, but a pretty good way to spend your time I say.

Black forest gateau Mum bday 2013 (1)

Ingredients

For the cake:

  • 75g butter plus extra for greasing
  • 175g caster sugar
  • 50g plain flour
  • 50g unsweetened cocoa powder
  • 5 eggs

For the filling and topping:

  • 75-90ml Kirsch (cherry liqueur) – I didn’t have any so I used raspberry liqueur instead (Chambord), but the gateau would work without it
  • 600ml double cream
  • 425g can black cherries, drained, pitted and chopped – fresh or frozen ones would work too

For the decoration:

  • 225g plain chocolate (70% cocoa)
  • cherries

Method

  • Preheat the oven to 180 degrees C/350 degrees F/Gas 4. Grease and line two 20cm cake tins with baking paper.
  • Melt the butter over a low heat and leave to cool.
  • Beat the eggs and sugar with an electric whisk for about ten minutes, or until the mixture is thick and pale and leaves a trail when the beaters are lifted.
  • Sift together the flour and cocoa powder, then sift again into the whisked mixture. This helps make it really light. Fold in gently using a metal spoon.
  • Add the cooled, melted butter and fold in gently.
  • Divide the batter between the tins and make sure it’s level. Bake for 30 minutes until the sponges are springy to touch. Leave in the tin for 5 minutes then turn out onto a wire rack to cool. Peel off the baking paper.
  • Cut each cake in half horizontally. This was the tricky bit! Then sprinkle each layer evenly with liqueur.
  • Whip the double cream until it holds soft peaks. Transfer two thirds of the cream to another bowl and stir in the chopped cherries.
  • Now you can start assembling the gateau. Place a layer of cake on a serving plate, spread one third of the filling on top, add another sponge and continue layering finishing with cake on the top. Use the remaining whipped cream to cover the top and sides of the cake. Decorate with chocolate curls and cherries.

How to make the chocolate curls…

  • Melt the chocolate in a heatproof bowl set over a pan of gently simmering water.
  • Spread the melted chocolate onto a baking sheet and put it in the fridge until it sets.
  • Using a sharp knife, scrape along the surface of the set chocolate to make thin curled shavings

IMAG3424-1IMAG3426

Claire

1

Sweetie Jar cake

IMG_3201

Time for another outrageous cake! I’m starting to love doing these. They’re so much fun. This was made for my special bud Sam for her birthday. My thinking behind it was quite simply: Sam loves sweets. Sam loves cake. Lets get those two together and create something truly disgusting! There were a few drafts before I came up with the final idea. Firstly I was going to make one big sponge in the shape of a sweet. Which then turned into me wanting to hide sweets inside the cake. Like a piñata cake. Which then turned into a cake covered in sweets but just a normal round sponge. Which then turned into shaping the sponge into a sweet jar. And voila! The sweetie jar cake was born. And then eaten. It had a short life poor thing.

IMG_3205Inside it’s a normal sponge peppered with hundreds and thousands to give it some colour. It seemed a shame to have just normal sponge under something so colourful.

The proper term is Funfetti cake I believe. It wasn’t that easy. The recipes all say to mix in your hundreds and thousands carefully so they don’t bleed into the batter. But I found they bled so quickly even one stir ruined them to smears. Not attractive. So I found the best way was to add a thin layer of batter to the tin, sprinkle on the H&Ts, then add another layer, sprinkle and so on until all the batter is gone. You will get some spreadage of colour but the majority will be ok.

Also, I couldn’t find bright hundreds and thousands in the shops. I had to go online. Look for their proper name of ‘Non-Pariels’. Who knew? Don’t use the bland coloured ones you’ll find in your supermarket, they will make your cake look like swampy sludge. You need the old school full of e-numbers stuff. This is cake people. No health here please. As I’ve harped on before, you need the bad stuff to make good cake! OK I’m off my soapbox now. See below for how I made it.

Ingredients:

Cake

  • 175g unsalted butter
  • 175g caster sugar
  • 175g plain flour
  • 3 large eggs
  • 2 tsp baking powder
  • Rectangular cake tin. Mine was 25cm X 17.5cm

Icing

  • 200g unsalted butter, at room temperature
  • 400g icing sugar
  • 2 tbsp milk

Decoration

  • Hundreds and thousands
  • Sweets – lots of

Method

  • Preheat over to 180′C/Gas Mark 4 and line your baking tin with baking paper.
  • Mix all your cake batter ingredients together by hand (good luck), electric hand whisk (better) or food mixer (now you’re talking!)
  • IMG_3198
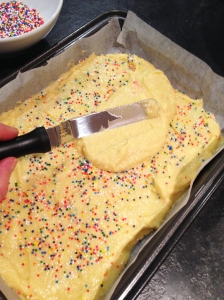
Get a small palette knife and spread a thin layer of batter in the cake tin. Liberally sprinkle a layer of hundreds and thousands. Add more batter in small dollops, then spread out flat with your knife. And another layer of hundreds and thousands. Repeat until batter has gone. Top layer should be batter. I think I only managed about three layers.
  • Place in oven and bake for 30 minutes.

For the buttercream:

Beat the icing sugar and butter together for at least 3 minutes. Add the milk to loosen it if it’s too thick.

IMG_3200Once the cake is cooked remove from the oven and leave to cool in the tin for about 20 mins. Then remove from the tin and leave to cool fully on a wire rack. Whilst cooling make a sweet jar template on a piece of paper. I got one off the net and cut it out to fit the tin. Place it on top of the cooled cake and cut out your jar. Now its time to add the buttercream. Spread a thin layer on first. It’ll be very crumby but that’s OK. Leave it in the fridge for 30 mins to harden. Then add another layer, a bit thicker and it should be pretty crumb free. It doesn’t have to look perfect as you’ll be covering it in sweets. It’s merely acting as a glue.

Then its the fun part. Get your sweets and start sticking! There was no pattern, I just went for it. Leave the smaller sweets to fill in the holes. For the lid I had some orange royal icing which I simply rolled and cut to look as much like a lid as possible. I attempted to spray it silver but that failed miserably. In the end the orange stood out far better anyway.

I was anxious to see if the inside had really worked but obviously had to wait until the birthday girl had seen it. Not sure turning up with a cake cut into is the done thing. Success!

IMG_3210

So pwetty…..

I was very pleased with this cake. It was impossible to eat and smelt revolting (I’ve never smelt anything so sickly sweet). But it looked fab and Sam loved it. Job done!

Sarah

0

CAKE FAIL

This is the sad tale about an apple and nut cake. Or as it should be called, The Splat Cake. Short story is, I took it out the tin too soon. Possibly it wasnt cooked long enough. Be warned people!!! You could end up with something like THIS:

cake failA tragic piece of baking. On the plus side, it tasted immense!!!! Just don’t look at it. Please.

Recipe from the hummingbird bakery book.

Sarah


1

Swedish Almond Cake

IMG_3147

So we’ve neglected our blogging duties for a bit (a rather long bit) but we’re back now. Baking loud and baking proud. And to start off the new years baking proceedings I present to you the Swedish Almond cake. Now essentially this is a vanilla sponge with sugary sweet almonds on top. But its not a sponge like we know it. This version is rather eggy and low on butter. It doesn’t taste much different to the normal sponge, maybe slightly heavier? I think its just as good though. But it’s the topping that really makes it. Sweet, crunchy, delicious almonds. I’m a sucker for almonds in a cake.

IMG_3154

I got this recipe from my ‘Rachel Allen’s Cake Diaries’ and followed the recipe exactly. See below:

INGREDIENTS

  • 3 eggs
  • 150 g caster sugar
  • 150 g plain flour
  • 1 1/2 tsp baking powder
  • 2 tsp vanilla extract
  • 3 tbsp milk
  • 75 g butter, melted, plus extra for greasing

For the topping

  • 50g butter
  • 100g flaked almonds
  • 50g caster sugar
  • 2 tsp plain flour
  • 3 tbsp double or regular cream
  • 1 tsp vanilla extract

METHOD

  1. Preheat the oven to 180C/160C fan/gas 4. Grease the base and sides of a 23 x 6cm springform or loose-bottomed cake tin with butter and dust with flour – if you’re using a spring-form tin, make sure the base is upside down, so there’s no lip and the cake can slide off easily when cooked.
  2. Using a handheld electric beater or an electric food mixer, whisk together the eggs and the sugar for 5-7 minutes, or until thick and mousse-like.
  3. Sift in the flour and baking powder and pour in the vanilla extract, milk and melted butter, then fold everything in until combined. Tip the mixture into the prepared tin and bake for 30-35 minutes, or until a skewer inserted into the centre of the cake comes out moist but not totally clean, as the mixture will still need another 10 minutes of cooking. Increase the heat to 200C/180C fan/gas 6.
  4. For the topping: Just before the 30-35 minutes are up, make the topping. Place the butter in a saucepan over a medium heat. When it has melted, add the remaining ingredients and bring to the boil, allowing the mixture to bubble away for 1 minute.
  5. After the cake has been cooking for the first 30-35 minutes, remove it from the oven and spoon the almond mixture evenly over the top. Place it back in the oven and bake for about 10-15 minutes or until the topping is golden.
  6. Leave to cool in the tin for 10 minutes. Using a small, sharp knife, loosen around the edges and carefully remove the sides of the tin before placing the cake (still on the base of the tin) on a wire rack to cool down fully.

This cake is seriously tasty. Even my brother loved it and he’s no cake fan. If you like almonds and love cake, this is the one for you.

Sarah x

0

Luxury mince pies

Mince pies

Seasons greetings all! The festive period is approaching. Some may say it’s already here. If you’re a home baker then it’s definitely time  to be thinking about what you are going to bake this Christmas. Hurray! Maybe you’ve already started.

Mince pies are a traditional choice, dating back hundreds of years, and there are many possibilities to try for the pastry, the filling and the topping. They haven’t always been sweet though and were once filled with meat and suet along with fruits, spices and alcohol. Here’s a few traditions, apparently, which I read about on the internet so they must be true:

  • Only stir the mincemeat mixture clockwise because stirring it counterclockwise is bad luck for the upcoming year.
  • While eating the first mince pie of the season, it’s traditional to make a wish.
  • Always eat mince pies in silence.
  • Eating a mince pie each day of the 12 days of Christmas is good luck for the upcoming year.

Not sure about eating them in silence, but that last one sounds pretty good to me.

The internet also provided me with many options for mince pie recipes and I’ve mixed a couple together for these particular pies.

This isn’t the quickest recipe, but it doesn’t take too long and the results are definitely worth it. The cranberries and brandy in the mincemeat, the orange zest in the pastry, and the sweet and creamy vanilla almond topping make these mince pies extra special. Here’s how to bake them (approx 24):

Ingredients for the pastry (Yes, I did make my own pastry. Smug. I did use a food processor though. Is that cheating?)

  • 200g very cold butter, cubed
  • 400g plain flour
  • 100g ground almonds
  • 100g golden caster sugar
  • zest 2 small oranges
  • 2 tbsp milk

Ingredients for the filling

  • Approximately 400g mincemeat
  • Approximately 85g cranberries (I used frozen ones)
  • 100ml brandy

Ingredients for the vanilla almond topping

  • 125g salted butter, slightly softened
  • 125g icing sugar plus extra for dusting
  • 25g plain flour
  • 125g ground almonds
  • 1/2 vanilla pod, split down the centre and seeds scraped out
  • 2 eggs

Method

  • Pastry – Whizz the butter, flour and ground almonds in a food processor until they resemble breadcrumbs. Pulse in the sugar and half the orange zest. Add the milk and keep whizzing until a rough dough comes together. (Mine sort of came together, but I had to take it out of the processor and knead it for a bit.) To make by hand – rub the butter and flour together with your fingertips until they look like breadcrumbs; stir in the almonds, sugar and orange zest; then stir in the milk and bring it all together in a dough.
  • Tip onto the work surface, press together and shape into a smooth disc, kneading once or twice if you need to. Chill for 15 minutes. This can be made up to 3 days ahead and chilled, or frozen for up to 1 month.

Mince pies pastry

  • Heat oven to 200C/180C fan/gas 6.
  • Prepare the filling – While the pastry is chilling, mix the mincemeat, cranberries and brandy together to soak.
  • Make the topping – Use an electric beater to whisk the butter and icing sugar together for a few minutes. Stir in the flour, ground almonds and vanilla seeds. Beat in the eggs gently, then continue to whisk for 4 or 5 minutes until the mixture is light and fluffy again. (Mine didn’t go light and fluffy again and was a bit runny, but it still worked.)
  • Prepare the cases – On a lightly floured work surface roll out the dough to about the thickness of a £1 coin, (some of mine were a little thicker as I didn’t want to keep rolling the pastry in case it broke apart!). Using an 8cm cutter (I used a glass), stamp out 24 circles and use to line the holes of a bun tray. (To avoid the pastry breaking push it down gently into the tin.)
  • Assemble the pies – Spoon the filling into the cases (I poured the filling through a sieve first to drain off the excess juice to avoid a soggy bottom!). Then place a dollop of almond topping on each one. Not too much as it spreads when cooking, but try to cover the top of the mincemeat.

Mince pies filled cases

  • Bake the pies for 18 to 20 minutes until golden.

Make a wish (if it’s your first mince pie of the season) and enjoy. For extra decadence, serve with ice-cream, double cream or vanilla custard. Maybe even all three. Well, it is Christmas.

Claire

1

Coffee and walnut cake with coffee buttercream

Coffee and walnut cakeThe coffee and walnut cake. What is there to say about it? It’s a classic cake. It’s also delicious. Fact. If you look up delicious in the dictionary there will be a photo of a coffee and walnut cake. If you disagree on how tasty it is then you are a fool! Bit harsh? Nope. Well, maybe, but I think it might actually be the law to like it. So because it is amazing I decided to bake one and eat it. I could have baked it in two cake tins to sandwich together, but I thought I would try it in two loaf tins so that it would be easier to slice (and look nice in a photo!). This cake is topped with light and fluffy coffee buttercream, A LOT of it, and lovely crunchy walnuts. Mm mm mmmm! You could swap it for decaff if you’re caffiene free. Here’s how to bake it:

Ingredients for the cake

  • 225g unsalted butter
  • 225g caster sugar
  • 225g self-raising flour
  • 1 tsp baking powder
  • 4 medium eggs
  • 3 tbsp strong instant coffee
  • 2 tbsp boiling water
  • 100g chopped walnuts

Ingredients for the buttercream

  • 150g unsalted butter (room temperature)
  • 300g icing sugar
  • 2 tsp strong instant coffee
  • 1 tbsp boiling water
  • Chopped walnuts

Method for the cake

  • Preheat the oven to 180 degrees C/350 degrees F/gas mark 4 and grease and line the cake tin
  • Dissolve 3 tbsp coffee in 2 tbsp water and leave to cool
  • Cream together the butter and sugar until pale, light and creamy
  • Add one egg at a time, beating well into the mixture after each addition
  • Add the cooled coffee into the cake mixture and beat until well combined
  • Add the flour, baking powder and walnuts and mix well together
  • Divide into the cake tins and smooth over the top with a palette knife or a wooden spoon
  • Bake for 25 to 30 minutes or until a skewer inserted into the centre of the cake comes out clean
  • Allow the cakes to cool (out of the cake tin) before icing

Method for the buttercream

  • Make up 2 tsp of instant coffee dissolved in 1 tbsp boiling water and leave it to cool down
  • Beat the butter and icing sugar together until pale and light
  • Add the coffee and mix together well
  • Spread the buttercream over the top of the cake (and in between the two sponges if making a layered cake)
  • Sprinkle over chopped walnuts

EAT!

Claire

0

Bake sale cupcakes

photoJust a quick post to show you these rather bizarre cupcakes I made. I pretty much threw everything I had decoration wise at them. I was feeling pretty ill yesterday. I believe its what scientists call a ‘hangover’ and I was not really in a baking frame of mind. After a bit of dodgy piping and failed random creativity (I have no idea what I was trying to achieve with that green one) I pretty much filled small bowls with various decorations, covered the cakes with buttercream and literally dunked them in the bowls. Quick, efficient and super easy when feeling delicate. I’ve taken them to work where we hope to raise money for the Philippines crisis. Seems a lot of people have contributed their baking creations for this great cause so good show everyone.

Sasa

5

Disco Loaf

IMG_2529Is this cake bright enough? IS IT? Yes it really is isn’t it. Sometimes all I want is a simple sponge. But you have to admit, the insides lack a certain something. Panache. Snaz. Etc. The outside can easily be decorated but the inside? The inside alas, gets forgotten. But not by me. This actually harks back to when I was a kid. A simple sponge was my limit but I could go nuts with the colours. E numbers were my childhood drug of choice. Recently I bought a load of food colouring (the liquid kind) and made a sponge ring cake. The colours were so insipid. What a letdown. I checked the bottles and they were made with ‘natural’ food dyes. Bleugh. I don’t want natural! You think when I’m eating cake I’m thinking of my health? Who is for crying out loud? Give me those E numbers and give them to me now. So the next obvious step was to get some PROPER food colour. And that came in the form of paste. That stuff is the shizzle. I knew it wouldn’t let me down (because I already had it in red). There are soooo many colours available but I went for the classics. They come in small pots and are like intensely coloured goo.IMG_2625 You need such a small amount so start with a bit and work up. Also the baking process tends to make colours more intense I find. This happened with the purple. It didn’t look great raw but turned out lovely once it came out the oven. These are by Sugarflair but there are other brands around.

I made a normal sponge but divided the mixture between four bowls and added food dye to each. Next I shoved the batters into piping bags and sniped the ends off. Only about 1cm up. Then I proceeded to make strips in my pre-lined loaf tin, so it ended up looking like this:

IMG_2519

I  baked it in the oven for about 30-40 mins on about gas mark 4 until cooked.

IMG_2520I ate my first slice warm and was transported back to childhood. Thank you radioactive food colourings! You bring me joy.


Sasa